

Overview
from readypipe import requests, starting_task, schedule, subtask, save
"""a simple example of a Readypipe system"""

@starting_task
def get_urls():
    response = requests.get('https://example-json-site.com')

    data = response.json()

    for url in data['urls']:
        # use schedule to write data to a queue
        # and make network requests in parallel
        schedule("extract_items_from_url", (url, ))

@subtask
def extract_items_from_url(url):
    response = requests.get(url)

    data = response.json()

    for item in data['items']:
        # creating databases and database records couldn't be simpler
        save("items_table", {'item': item, 'url': url})
Readypipe makes it easy to extract data from websites.
All you need to use Readypipe is a web browser and an Internet connection - no need to install anything on your computer.
With Readypipe, you can write and run Python code right from your browser, create and interact with databases with a dead-simple API, run your code on a schedule, receive email alerts when errors occur, and much more.
Readypipe is written in Python 3. Get started by logging in.
If you have any questions not addressed in this guide, let us know at support@readypipe.io.
Getting Started
Workspace Environment
Readypipe uses JupyterLab, an open source tool, to power the Workspace environment. JupyterLab provides building blocks for interactive programming: a file browser, terminals, interactive notebooks and a text editor.
When you open the Workspace environment, the file browser is displayed on the left side screen.
The file browser:
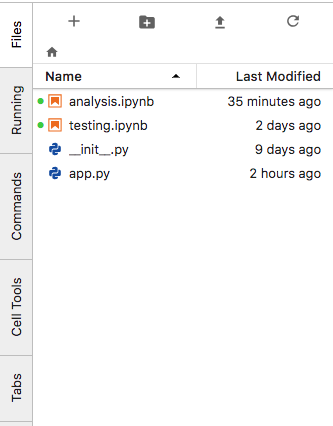
The file browser is similar to a Desktop: you open files by double-clicking on their name, create new files with the + button, and upload files with the up-arrow button.
Upload files:

After clicking the + button, the "Launcher" tab is opened. It provides you with options to create a new Python Notebook, open a "Python Console" (an interactive Python shell), open a new Terminal session, and has a Text Editor for creating other types of files.
The Launcher:

To create a new Python file, use the Text Editor button to create a new .txt file. Right click on the file in the file browser to rename it. Once you change the file extension to .py, Readypipe will recognize it as a Python file.
Opening two Workspace windows
Opening two browser tabs from the same project can be useful.
When you attempt to open two instances of the same Workspace environment, the following error may appear:
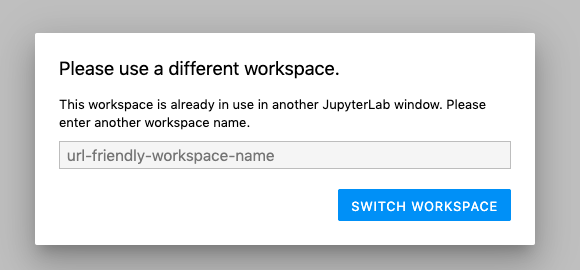
To resolve this error, simply provide a new "URL-friendly" name for the second Workspace tab. This can be any alphanumeric name, but cannot contain spaces (use underline characters instead).
Typing in a new name and pressing the "Switch Workspace" button will resolve the error and allow you to work in both tabs at once.
Changing Workspace preferences
The Workspace environment is customizable at the individual project level (settings are shared across users today).
You can easily map Jupyter's text editor keyboard shortcuts to a number of common settings.
This is changed in the Workspace environment under the Settings menu:

You can also change the Readypipe color scheme to dark mode:

Workspace shortcuts
A few shortcuts and hotkeys can make it easier to navigate notebooks quickly. There are several types of shortcuts: global, command and edit.
Global shortcuts work anywhere in JupyterLab:
| Action | Shortcut Keys |
|---|---|
| Save file | Ctrl + S |
| Close file / tab | Ctrl + Q |
| Change tab | Control + Shift + [, Control + Shift + ] |
Use the Esc key in a Notebook file to activate Command mode. Among other things, this allows you to navigate the notebook using arrow keys:
| Action | Shortcut Keys |
|---|---|
| Activate Command Mode | Esc |
| Navigate between cells | Arrow keys |
| Insert new cell above current selected cell | A |
| Insert new cell below current selected cell | B |
| Delete the current cell | D + D (press D twice) |
Use the Enter key in a Notebook to activate Edit mode. You can also do this by clicking into the cell:
| Action | Shortcut Keys |
|---|---|
| Activate Edit Mode | Enter |
| Show the documentation for the object in the code cell | Shift + Tab |
| Find and replace on your code | Esc + F |
| Indent line | Ctrl + ] |
| Dedent line | Ctrl + [ |
| Undo | Ctrl + Z |
| Go to cell start | Ctrl + left arrow |
| Go to cell end | Ctrl + right arrow |
| Run cell | Ctrl + Enter |
| Run cell, select below | Ctrl + Shift + Enter |
| Toggle comment on line | Ctrl + / |
Running Python in a Notebook
Notebooks provide an interactive way to write and run Python code in Readypipe.
You can think of Notebooks like a scratch pad - good for testing code and cleaning and analyzing data.
Notebooks have a file extension .ipynb and are created by clicking the + button in the file browser and selecting Python 3 in the Notebook section.
Notebooks contain text inputs called cells, square boxes where you can write Python code. To run Python code in a cell, simply click the cell and press the play button in the notebook toolbar.
A Notebook cell:

You can also run the Python in the cell with the Shift + Enter shortcut.
Saving code
Files in Jupyter are automatically synced to the cloud when saved. When you have unsaved changes in your file, a black dot will appear in the file name tab. Once it's been saved, the black dot will disappear.
A file with unsaved changes:

To save your file, you can click the floppy disk button below the file name tab or use the Ctrl + S (Windows) or Cmd + S (Mac) shortcut.
After saving the file:

Notebooks and py files
# app.py
def my_finished_function():
    # some code...
    ...

########################

# testing.ipynb
from app import my_finished_function

my_finished_function()
Re-import my_finished_function in testing.ipynb if you change it's definition in app.py
Jupyter provides a simple way to work in both notebooks and standard (.py) Python files.
A common workflow is to experiment with code in a notebook file until you're confident it will work as expected, and then move this "finished" code to a separate Python .py file.
You can also easily import finished code from a .py file back into a notebook using an import statement.
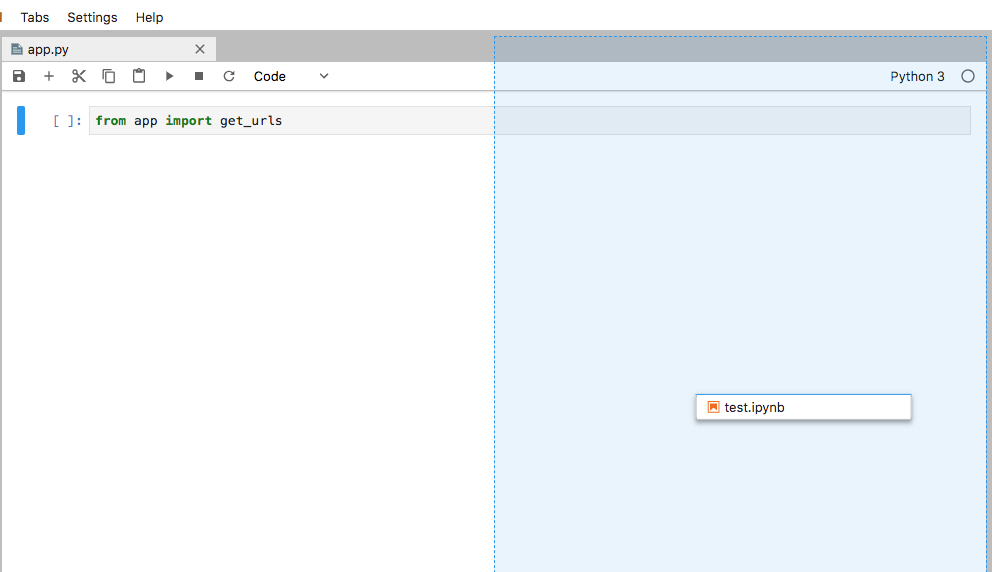
When working across multiple files, it can be very helpful to tile the files in the Workspace.
To do this, simply click and hold the file tab and drag it to the left, right, top or bottom of the Workspace area. The file will be moved when you release if the destination area is highlighted in blue:
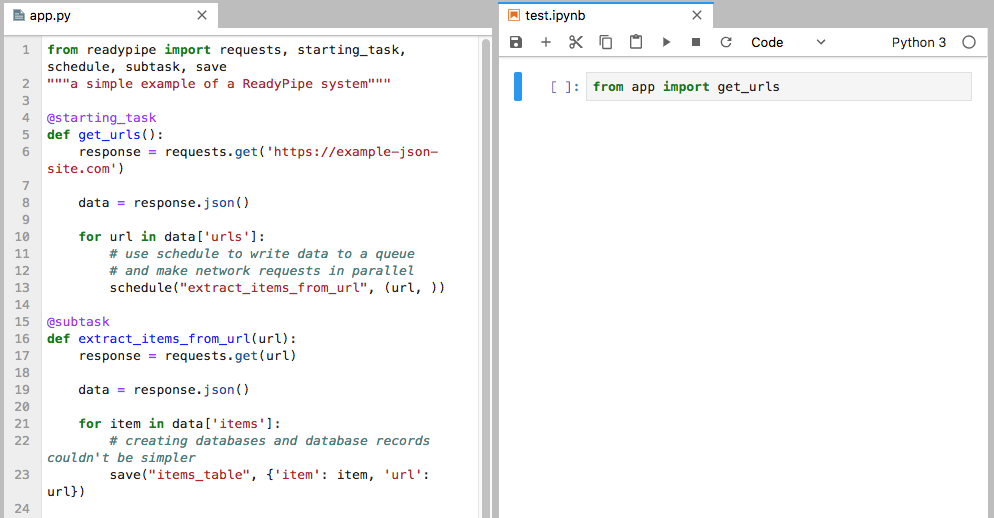
Click on the file tab and drag your cursor until the blue shading lines up with where you want the file placed
When you release, the files will be laid out side-by-side
Notebook Troubleshooting
Occasionally, a Notebook will behave in unexpected ways or even crash.
When this happens, don't worry - a simple "when all else fails" solution is to go to the "Kernel" tab in the Jupyter menu and select the Restart Kernel option.
The kernel menu:
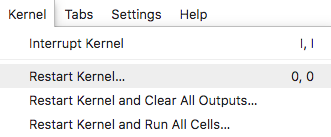
Restarting frequently fixes unexplained issues, though you'll need to re-run any Notebook cells you want executed.
Simple Requests
readypipe.requests is our version of the Python requests library, including the Requests-HTML extensions, designed specifically to make it as easy as possible to collect and process web data.
Getting data from the web
from readypipe import requests

# get()
get_response = requests.get('https://example.com')
print(get_response)
# >>> <Response [200]>
# post()
data = {'post': 'data'}
post_response = requests.post('https://example.com', data=data)
print(post_response)
# >>> <Response [200]>


# HTML content
response = requests.get('https://html-example.com')
print(response.content)
# >>> b'<!DOCTYPE html><body><p>Hello!</p></body></html>'


# JSON content
response = requests.get('https://json-example.com')
data = response.json()
print(data['urls'])
# >>> ['https://json-example.com/url1', 'https://json-example.com/url2']


# Using Xpath on the HTML tree
response = requests.get('https://html-example.com')
urls = response.html.xpath('//a/@href')
print(urls)
# >>> ['https://html-example.com/url1', 'https://html-example.com/url2']
The readypipe.requests module adds up-to-date user agent headers and a proxy IP address to each request automatically. It also logs metadata with each request, which can be useful when debugging.
readypipe.requests includes a number of convenience methods for parsing web data:
.get(url, *args, **kwargs).post(url, data, *args, **kwargs)
These behave just like get() and post() from the python-requests library, returning a Response object.
You can view the raw content of the Response object with .content.
If the response content is JSON, you can parse the JSON into a Python dictionary using .json().
If the response content is HTML, you can access it as an element tree object using .html. You can query this object using XPath.
User Agent management
Websites will sometimes adjust the content returned by their servers depending how old the user agent headers of your request are.
This can cause maintenance headaches if you're collecting data on a long-term basis.
We address this by tracking user agent headers for current versions of popular browsers and device types and automatically attach up-to-date headers to each request.
from readypipe import requests

# you can pass standard requests arguments
# to readypipe.requests methods
response = requests.get(
    'https://example.com',
    headers={'example_header': 'header_value'},
)
Proxy management
Collecting location- or region-specific data from a site can be challenging if your requests aren't coming from IP addresses located in that area.
We use a global network of proxy IP addresses to make it easy to collect location-specific data. We automatically assign a proxy IP address in our pool to make each request.
Browser-based scraping
The open_browser object
Some sites have a request flow that can be challenging to successfully replicate using simple (HTTP) requests.
We strongly encourage Readypipe users to attempt to build their projects using simple requests, and only fall back to the browser feature if this is not possible.
Readypipe's open_browser feature provides users with browser functionality that works similarly to a typical browser.
Comparison with "simple" requests
Advantages
Full webpage rendering
A browser renders the entire webpage you visit (though open_browser won't download images by default for a number of reasons). Unlike simple HTTP requests where each request must be made explicitly, a browser will make the same requests your browser makes to load a webpage.
Loading dynamic data
As a result of rendering the full page, browsers include data in response content that may be injected into the HTML template using JavaScript.
While it's often a better approach to make a simple request directly to the endpoint injecting the data and parse the response there, this can be challenging at times. A browser can be useful in those cases.
Is a real Chrome browser
Some websites require interacting with JavaScript to return successful responses. While simple requests do not load JavaScript and may experience issues on these sites, because it loads JavaScript a browser will often be more successful in collecting data from those sites.
Readypipe's browser scraper is a modified version of the Chrome browser.
Drawbacks
Getting site responses takes longer
Because a browser frequently has to make many requests (page templates, CSS and JavaScript files, etc.) to render a single webpage, it can take considerably longer to load a page and extract the data you want.
Stability issues
While simple requests are fairly stable, browsers can be more error-prone. While modern browsers have gotten much more robust, simple requests will be more consistent in handling web requests and responses.
Readypipe's automatic retry feature helps to mitigate these issues, but users should anticipate a higher incidence of errors when using browsers to collect data.
In a future release of this documentation, we will include additional context around what common errors mean and the impact they have on a scrape.
Difficult to test during development
Though the visual_debug feature provides some visibility into what is being rendered in the browser, testing using this feature can be challenging. It can also be complex to replicate the webpage the browser is rendering.
Only logs the main request
In the current version of Readypipe, both open_browser and selenium will write to the pipeapp_http_requests table (helpful when debugging). However, only the main request (.goto() in open_browser and .visit() in selenium) will be logged.
Additional background requests needed to render the page (Javascript requests, static assets, etc.) are not logged to this table.
Using open_browser
Core API
from readypipe import (
    open_browser, starting_task, save_many)

from lxml import etree


@starting_task
def simple_browser_scraper_example():
    URL = 'https://www.example.com'

    # open_browser requires a "context"
    # you create a context in Python using
    # the `with` keyword as below
    with open_browser() as browser:
        # .goto() does not return a response
        browser.goto(URL)
        # get the response content
        content = browser.content()
        # convert the response content to a DOM object
        dom = etree.HTML(content)

        # once you have a DOM object, the rest of your
        # task definition will match the parsing flow
        # used with standard requests
        prices = dom.xpath('//div[@class="price"]/text()')
        save_many('price_data', prices)
open_browser works in a specific context - you can create a context using the with keyword in Python.
In this case, the context is the browser being open; executing the with statement opens the browser, and when your code exits the block, the browser is automatically closed. Any code that interacts with the browser should therefore be indented inside of this block.
To make it easier to work with, you should give open_browser() an alias when defining the context it should work in. In the example on the right, the alias we give it is simply browser. You can then reference the alias inside of the with-block.
After aliasing, the following methods allow you to interact with the browser object. For clarity, we'll assume you use the alias browser in the below.
open_browser(visual_debug=False)
# VISUAL DEBUG MODE
# in a notebook: testing.ipynb
from readypipe import starting_task, open_browser

from lxml import etree

@starting_task
def render_readypipe_site():
    # instantiating open_browser with visual_debug = True
    # will display
    with open_browser(visual_debug=True) as browser:
        browser.goto('https://readypipe.com')
        content = browser.content()
        dom = etree.HTML(content)
When executed in a notebook, the cell will display the site in the output area below
Creates a browser instance. Requires a context to operate in.
| Parameter | Type | Description |
|---|---|---|
| visual_debug | bool | Debugging feature for use in a notebook. Renders the page content of the browser in a cell output. Updates the image every few seconds. Default = False |
browser.goto(url, *args)
Loads the webpage at url. No return value.
| Parameter | Type | Description |
|---|---|---|
| url | string | The URL the browser should load |
browser.content()
Returns the page content after calling .goto() to load a webpage.
browser.auto_scroll_to_end(height=0, distance=100, interval=250)
Returns the total number of pages scrolled.
Automatically scrolls to the end of the page, which can be useful for pages with "infinite scrolling". No return value. visual_debug=True can be particularly helpful when testing this feature in a notebook.
| Parameter | Type | Description |
|---|---|---|
| height | int | The entire page height in pixels. If unknown and you want to scroll the whole page, use the default of 0 |
| distance | int | The number of pixels to travel in each scroll event. Default = 100 |
| interval | int | The number of milliseconds to delay between scroll events. Having a delay > 0 is helpful for pages using infinite scrolling. Default = 250 (1/4 second) |
browser.get_responses(matching_urls=None)
Returns a list of response objects created by the background requests the browser makes while rendering a webpage.
This is particularly helpful for sites where the target data is loaded via one or more JSON background requests made in order to properly render the webpage template.
| Parameter | Type | Description |
|---|---|---|
| matching_urls | list | List of URL strings to try and find the responses to. Includes partial matches (matching_url is found in part of the response URL). If no matching_urls are passed, returns all responses. Defaults to None |
Page interactions
from readypipe import open_browser, starting_task

@starting_task
def kickoff():
    with open_browser() as browser:
        # go to the target page
        browser.goto('https://example-site.com')

        # select the search option to search the entire site
        browser.select('select[id="searchDomain"]', 'Entire Site')

        # type a search query into a form
        browser.type('input[id="searchForm"]', 'My search query')

        # execute the search query by clicking
        # on the "Search" button (id attribute "search")
        # and don't advance until the request is finished
        with browser.wait_for_navigation():
            browser.click('button[id="search"]')

        # continue with code as normal...
        ...
For some sites, it can be helpful to execute realistic interactions with the page DOM to get the data you want. The browser scraper can handle the majority of interactions with a few methods.
While most Readypipe methods use more expressive XPath expressions to interact with the DOM, the following methods currently only support CSS Selectors. Adding support for XPath interactions is on our roadmap, and this documentation will be updated when that is available.
You can convert most XPath expressions to CSS Selectors using this tool.
browser.select(css_selector_string, value)
When working with drop-downs and other "selectable" form elements, selects a specific option from the list.
Note the value argument should match the value of the value attribute of an option tag.
For example, if your option tag is <option value="Entire Site">, you'd pass value="Entire Site".
| Parameter | Type | Description |
|---|---|---|
| css_selector_string | string | A CSS selector string matching the option element you want to select |
| value | string | The value of the option you want to be selected |
browser.type(css_selector_string, text)
Selects a form input element and types text into it.
| Parameter | Type | Description |
|---|---|---|
| css_selector_string | string | A CSS selector string matching the form element you want to type into |
| text | string | The text to type into the form input |
browser.click(css_selector_string)
Selects an element and clicks on it.
| Parameter | Type | Description |
|---|---|---|
| css_selector_string | string | A CSS selector string matching the element you want to click on |
browser.wait_for_navigation()
Some page interactions (like clicking a "search" button) will execute navigation actions. In these scenarios, you'll want to require the browser to wait until the navigation action is complete before advancing.
wait_for_navigation() creates a context and should be used with the with keyword.
Once instantiated, the browser will wait until all navigation actions are completed within the context before advancing.
browser.wait_for_selector(css_selector_string, {'timeout': 3000})
from readypipe import open_browser
from pyppeteer.errors import TimeoutError

with open_browser() as browser:
    browser.goto('https://example.com')
    # timeout parameter is the number of milliseconds to
    # wait until raising an error; in this example, 3 seconds
    try:
        # timeout is an optional parameter to include
        element_i_care_about = browser.wait_for_selector(
            'SOME-CSS-SELECTOR', {'timeout': 3000})
        if element_i_care_about:
            # do something with the element...
            # ...
    except TimeoutError:
        # handle the element not loading in time
        # ...
Blocks additional code from running until the part of the page matching the selector is loaded.
Useful when a site loads interesting content you want to scrape a few seconds after the main page response loads.
| Parameter | Type | Description |
|---|---|---|
| css_selector_string | string | A CSS selector string matching the element you want to click on |
Selenium
from readypipe import selenium, starting_task, subtask

# because selenium is often unstable,
# we suggest starting a scrape with a
# "dummy" starting task.
# this allows the user to take advantage
# of automatic subtask retries.
@starting_task
def kickoff_selenium_scrape():
    # the dummy starting task immediately
    # schedules work in the subtask
    # so it will retry if it fails
    schedule('run_selenium_scrape', (1, ))

@subtask
def run_selenium_scrape(kickoff):
    # normal selenium logic below...
    ...
Readypipe now supports Selenium-based scrapers in addition to the open_browser feature.
This is primarily to assist in migrating existing scrapers to the Readypipe platform.
When building new scrapers, we strongly encourage using the open_browser feature, as this is the feature we are actively investing in developing.
There are some syntax differences between Selenium and open_browser
Debugging in Readypipe
PDB
def get_urls():
    response = requests.get('https://example.com')

    data = response.json()

    import pdb; pdb.set_trace()
    for url in data['urls']:
        ...

get_urls()
# /home/readypipe/app.py(4) get_urls()
# -> urls = requests.get('https://example.com').json()['urls']
# (Pdb) >>>
Calling get_urls in a Notebook launches an interactive debugger, since the function definition includes
pdb.set_trace()
Adding the line import pdb; pdb.set_trace() in a Readypipe file launches an interactive source code debugger at this line.
pdb lets you step through lines of your code one by one, making it easy to debug code or examine variables interactively.
The following key commands can be useful when using the pdb debugger:
nruns the next line of codeccontinues running your code until the next debugger line is encountered (useful for loops)llexpands the number of lines displayed in the pdb consoleaprints the arguments of the current functionu/dmoves the current frame levels up and down in the stack trace, respectivelyqquits the pdb debugger
Additional detail can be found on the offical pdb documentation.
Advanced Usage
Notebook files are great for simple data collection use cases, but sometimes you need more powerful tools to collect data in the way you want.
By changing your code in a few simple ways, it's easy to scale up the amount of data you can collect, write data to a database, or deploy a project to run on a schedule.
Project design best practices
"""an example of a well-designed project"""
from readypipe import requests

def find_category_urls():
    response = requests.get(
        'https://json-example.com/all-categories')

    return response.json()['urls']


def get_item_urls_from_category_url(category_url):
    response = requests.get(category_url)

    return response.json()['item_urls']


def collect_details_from_item_page(item_url):
    response = requests.get(item_url)
    target_data = response.json()['target_data']

    return {'item_url': item_url, 'target_data': target_data}


# Main control function
def get_item_details():
    category_urls = find_category_urls()

    item_urls = []
    for url in category_urls:
        # put category requests in a separate function
        urls = get_item_urls_from_category_url(url)
        # use .extend() to get a flat list
        item_urls.extend(urls)

    item_details = []
    for item_url in item_urls:
        # put item detail requests in a separate function
        item_details = collect_details_from_item_page(item_url)
        item_data.append(item_details)

    return item_details
A very common data collection pattern is:
- Go to a site, find the categories you want to collect data from and extract the URL of each category
- Visit each category URL and extract the URLs of the items you want to collect data from
- Visit each item URL and extract and save the data you want to collect on those items
We suggest you separate each of these steps into its own function. Functions are defined using the def keyword, followed by the function name (def find_category_urls(): defines a function named find_category_urls). With this design, it's easy to isolate errors and scale the number of requests you can make at once.
In the example on the right, note how each "type" of request is separated into its own function:
- The function for finding the category URLs calls a separate function to find the item URLs
- The function to find the item URLs calls a separate function to find the item details
- The function to collect item details is separate from the other functions
At this point, we've only used Readypipe's requests feature - before we can use more advanced features, we'll need to introduce a new file.
The app.py file
Until now, we've only worked in Notebook files in Readypipe. This is great for making requests and working with the responses, but we haven't touched a number of powerful features.
A special Python file named app.py lets you deploy your project and use Readypipe's advanced features:
- Schedule a project to run in the cloud with a specific frequency
- Make requests in parallel so your project can collect data faster
- Get email alerts when errors occur so you can investigate
- Write data to a database so you have a single source of truth
- Log success and failure rates in each part of your project
app.py is included by default when you create a new project. You can write Python code in it and import that code into a Notebook to run it just like any Python file.
To import code from a Python (.py) file, you use an import statement. To import a function foo() from app.py: from app import foo. Note you don't include .py in an import statement, nor do you include parentheses ().
Readypipe will look for this file in your project. You can write code in other Python files, but to use Readypipe's advanced features, the code must be called in some part of this special file.
Scheduling code to run
# app.py
from readypipe import starting_task

# note we add a @ symbol to starting_task
@starting_task
def run_on_a_schedule():
    # some Python work...
    ...
A Readypipe starting_task is a function that can be run on a precise schedule.
Starting tasks are basically functions with special properties in Readypipe.
It's easy to convert a function into a starting task:
- Define the function in the
app.pyfile - Import
starting_taskfrom thereadypipelibrary; note it's imported without the@symbol - Put
@starting_taskon its own line, immediately above the function definition
Once app.py contains a function with the @starting_task decorator, Readypipe will recognize this function as a starting task.
You can schedule your starting task to run with a specific frequency in the Deployment environment (found in the navigation sidebar on the left).
Testing starting tasks
#####################################################
# app.py
from readypipe import (
    requests, starting_task, save)

@starting_task
def get_and_save_categories():
    ...


#####################################################
# notebook.ipynb
from app import get_and_save_categories
get_and_save_categories()
Once a starting_task is defined in your project's app.py file, it can be helpful to test your code before scheduling it to run.
Import your starting_task into a Notebook file just like you would import any other Python function. When you're ready to test it, simply call it like a normal Python function.
As a reminder, to import code from a Python (.py) file, you use an import statement. To import a function foo() from app.py: from app import foo. Note you don't include .py in an import statement, nor do you include parentheses ().
After you've tested your starting task and it looks like it's behaving as expected, you're ready to deploy your code so it can be scheduled to run.
Deployment environment
Once you've tested your starting task in the Notebook and you're comfortable your code works as expected, your starting task is ready to be deployed so you can schedule it to run automatically.
The Deployment environment offers two options for scheduling a starting task:
- Use the Deploy & Run Now button to immediately deploy and run your starting task
- Use the Advanced button and the scheduler input (it says 12:00AM by default) to set your starting task to run on a schedule
The Advanced button gives you detailed control over your project configuration. To set a starting task to run on a schedule, click the input below the name of the starting task to open the scheduler window.
# Cron notation:
# *    *    *    *    *
# min  hr   day  mo   day of wk

# Ex: Run every hour on the hour
# 0 * * * *

# Ex: Run every day at midnight
# 0 0 * * *
See the scheduler window for more detail
Readypipe uses cron notation for scheduling. It may seem a bit intimidating at first, but we include help text above and below the cron input to help you schedule starting tasks with precision.
The cron schedule helper:

Once you've confirmed a schedule, click Save Configuration and Deploy. Your project will then run using the schedule you set.
Request metadata logs
Debugging your code in a Notebook is easy, but debugging after a project has been deployed can be more challenging.
After deployment, it can be helpful to have metadata about each request a project makes.
To make this simple, we automatically log some metadata with each request.
Logged metadata includes:
- Request Headers
- Requested URL
- Final URL (useful for tracking redirects)
- Response status code
- Proxy IP address
- Request type
- Timestamp of the request
- Project run ID
Some of this metadata is visualized for you in the Monitoring environment, while the rest is freely available to you in AWS Athena (details in the Data environment).
Making requests in parallel
After making a web request, it can take several seconds before you receive a response. This may not sound like much, but if you're making millions of requests to collect data this can add up to hours of waiting for data!
Readypipe makes it easy to scale up the number of requests your project can make at once. Instead of making requests sequentially one at a time, you can configure your project to make requests in parallel.
Two changes are required to start making requests in parallel:
- Use Readypipe's
schedule()feature to add URLs (or other data) to a queue to process them in parallel - Define a
subtaskfunction to read several items from the queue at once
Passing data between tasks
from readypipe import (
    requests, starting_task, schedule, subtask)

@starting_task
def get_thousands_of_urls():
    response = requests.get('https://json-example.com')

    thousands_of_urls = response.json()['urls']

    for url in thousands_of_urls:
        # note the queue name and the subtask
        # function name are identical!
        schedule('make_parallel_requests', (url, ))


@subtask
def make_parallel_requests(url):
    # note the subtask name is the same
    # as the name passed to schedule!
    ...
Using schedule(), you can put data on a queue to be processed by another function (called a subtask) in parallel.
schedule(queue_name, data)
| Parameter | Type | Description |
|---|---|---|
| queue_name | string | Name of the queue to write data to |
| data | list/tuple of arguments | Data to write to the queue. Must serialize to a Python data type |
One important note is that unlike standard Python functions, we don't call our task functions or pass results around anywhere in app.py code.
Readypipe uses the starting_task and subtask functions with the schedule method to automatically flow data through our project properly.
Scheduling items in bulk
from readypipe import (
    requests, starting_task, schedule_many, subtask)

@starting_task
def get_many_urls():
    response = requests.get('https://json-example.com')

    data = response.json()

    # create a list to hold the parsed
    # data we want to schedule
    scrape_parameters = []

    for d in data['params']:
        # each item will be (url, name)
        param = (d['url'], d['name'])
        scrape_parameters.append(param)

    # note the queue name and the subtask
    # function name are identical!
    schedule_many('make_parallel_requests', scrape_parameters)


@subtask
def make_parallel_requests(url, name):
    # note the subtask name is the same
    # as the name passed to schedule!
    ...
When working with items at scale (1k+), you can see significant performance benefits by using the schedule_many() method to add items to a queue.
schedule_many(queue_name, data)
| Parameter | Type | Description |
|---|---|---|
| queue_name | string | Name of the queue to write data to |
| data | list of tuples of arguments | A list of tuples, each representing an item to write to the queue |
schedule_many() expects a list of tuples. Each tuple should represent an item to add to the queue. Items can have one or many arguments ([(1, ), (2, ), (3, )] or [(1, 'url-1'), (2, 'url-2'), (3, 'url-3')]), but the list should be passed as a single argument.
Rather than adding each item to the queue individually, items will instead be added in bulk.
Reading data from a queue
Before you can start using a queue, you'll need a new kind of task to read and process items off the queue.
In Readypipe, subtask functions read data from queues.
subtask and starting_task are similar in a few ways. You import both from the readypipe library and put @subtask on its own line immediately above the function definition to make it to a subtask.
from readypipe import starting_task, schedule, subtask

@starting_task
def get_urls():
    ...
    for rank, url in enumerate(urls):
        # note - to add two items to a queue,
        # pass them in a TUPLE as one argument
        schedule('make_request', (url, rank))

@subtask
def make_request(url, rank):
    # note that since we add BOTH url and rank
    # to the queue using schedule(), our subtask
    # must also take url and rank as arguments
    ...
One key difference is that while starting tasks take no arguments as inputs, subtasks take whatever arguments were added to the queue.
To scale up the number of requests a subtask makes at once, go to the Deployment environment and click on the Advanced button. On the right side, you'll see a list of subtasks and a dropdown with a number.
The number in the dropdown indicates the number of requests the subtask can make in parallel. To stop the subtask from making any requests, you can set this field to "Off".
Note: if schedule() has not been called for a given queue in the last 30 days, the existing items on that queue will automatically be removed.
Retries and attempts
from readypipe import (
    requests, starting_task, subtask, schedule_many, get_attempts)

@starting_task
def get_product_urls():
    res = requests.get('https://example.com/products')
    # extract product URLs to schedule
    product_urls = res.html.xpath(
        '//div[@class="product"]/a/@href')

    schedule_many('scrape_product_url', product_urls)


@subtask
def scrape_product_url(url):
    # limit the number of times a URL
    # will be retried before exiting
    MAX_ATTEMPTS = 5
    # use greater than or equal to
    # instead of just equal to
    # in the edge case where there are
    # already more attempts than MAX_ATTEMPTS
    if get_attempts() >= MAX_ATTEMPTS:
        # it can be helpful to log these
        # failed items to a separate table
        save('failed_items', {'url': url})
        # returning will not retry the item
        return

    # otherwise, proceed as normal...
    res = requests.get(url)
    ...
By default, if a subtask throws an exception, the task will automatically retry processing the same item again in 5 minutes.
Tasks will continue to retry until they are successful. However, this behavior is sometimes undesirable (for example, old URLs that no longer work will return 404 status codes, which Readypipe will automatically retry later).
To limit the number of retries a subtask attempts for each item, you can use Readypipe's get_attempts feature.
Readypipe automatically adds an attempts attribute in the state of each subtask item. get_attempts() will return the current value of that attempts attribute.
Note that since starting tasks do not retry, calling get_attempts() in a starting task will fail.
Each time a subtask execution fails, the attempts attribute for the item being processed will be automatically incremented.
Using the pattern to the right, you can limit the number of retries for each unique item; this prevents risky somewhat behavior, like retrying broken URLs every 5 minutes many times.
Rescheduling tasks
##########################################################
# rescheduling
from readypipe import requests, starting_task, schedule

@starting_task
def sample_item_urls(item_url):
    for data in requests.get(item_url).json()['data']:
        schedule("sample_item_urls", item_url)

    # don't add this url to the queue again
    # for another 30 days
    return (60 * 60 * 24 * 30)
Tasks can return integer values in their definition. This sets the number of seconds to wait to rerun that task using the same input.
Items can only be added to the queue once - this can be a convenient way of preventing your project from repeatedly collecting data from the same URL.
This is particularly useful when working with sampled data, when you may not want to re-sample the same data for some time.
Testing subtasks
################################################
# app.py
from readypipe import (
    starting_task, subtask, schedule)

@starting_task
def get_categories():
    ...
    for item_url in item_urls:
        schedule('get_item_details', item_url)


@subtask
def get_item_details(item_url):
    ...

################################################
# notebook.ipynb

# Testing a subtask with static arguments
# is similar to testing a @starting_task
from app import get_categories, get_item_details

# re-running this cell will continue to use
# https://example.com/item in each run
get_item_details('https://example.com/item')

# run_from_queue() pops real items of the queue.
# each time you run the cell, the next item
# in the queue will be tested by the subtask.

# note - get_item_details isn't called directly
# and no arguments are passed!
get_item_details.run_from_queue()
After importing a subtask into a Notebook, you have two testing options:
- Test the subtask with static arguments
- Test the subtask with real arguments from the queue
You can test a subtask with static arguments like you would any other Python function. This can be helpful when testing specific edge cases, or testing part of your code that failed on a previous run.
To test using live arguments from the queue, instead of calling the subtask directly, you use the .run_from_queue() method.
In our example, get_item_details.run_from_queue() would pull items off the queue one at a time and pass them to the subtask for testing.
.run_from_queue() is helpful for testing how your subtask handles real items present in your queue. Running this method more than once will process successive items from your queue.
When testing subtasks in a Notebook, any items passed to schedule() will appear in the output below the cell.
Virtual queues and tables
################################################
# app.py
from readypipe import (
    starting_task, subtask, schedule)

@starting_task
def get_categories():
    ...
    for item_url in item_urls:
        schedule('get_item_details', item_url)

@subtask
def get_item_details(item_url):
    ...

################################################
# notebook.ipynb
from readypipe import get_queue
from app import get_categories

# run the starting task to add
# item_urls to the queue
get_categories()

# use get_queue to access the queue's dataframe
item_details_df = get_queue('get_item_details')
When you call schedule() or save() (more detail here) in a Notebook in the Workspace environment, items are added to temporary queues and tables in memory only. To add items to a permanent queue or to a permanent database table, you must first deploy your project in the Deployment environment.
When testing in the Notebook, temporary queues and tables are stored in memory as pandas dataframe objects.
Readypipe also includes two methods to access these dataframes to use in the Notebook:
get_queue(queue_name)get_table(table_name)
Changing deployed code
Once deployed, your project will continue to read data from the queue until it's empty.
Your queue will not be emptied just because you make changes to your code.
If you want to change the number of arguments in a subtask's definition after your project is deployed and there are still items on the queue, your project will no longer be able to read from the queue successfully after the change.
To make this change, you have two options.
Clear the queue
Option 1) Make the desired changes and clear the queue if you don't care about losing that data
- Change the subtask and the
schedule()function that calls it - Go to the Deployment environment and click the Advanced button
- On the right side, find the subtask you changed and set the number of task items processed to "Off"
- Click the "Save Configuration and Deploy" button - this will pause the subtask you changed
- Go to the Monitoring environment and click on the Advanced button
- Find the subtask you changed, and click the "Clear Queue" button
Create a new subtask
from readypipe import starting_task, schedule, subtask


@starting_task
def updated_starting_task():
    ...

    # previously, this called schedule as follows:
    # schedule("old_subtask", (old_arg, ))

    # to add a new arg to a queue that isn't empty,
    # point schedule to a new subtask
    schedule("new_subtask", (old_arg, new_arg))

# old_subtask will continue reading the old
# items on the queue with only `old_arg`
@subtask
def old_subtask(old_arg):
    ...

# create a new subtask to read a new queue
# with both `old_arg` and `new_arg`
@subtask
def new_subtask(old_arg, new_arg):
    ...
Option 2) Create a separate subtask with the new arguments and leave the old subtask running until the queue is cleared
- Copy the original subtask definition, rename it and change the number of arguments it takes
- Change the
schedule()method of the task that feeds the subtask you changed to write the new number of arguments to the queue - Leave the old subtask in place to continue reading from the old queue
- Deploy your system
Working with uploaded data
from readypipe import starting_task, schedule, subtask

from pandas import read_csv

@starting_task
def read_file_data():
    # read CSV file and return a dataframe
    df = read_csv('data.csv')
    # convert column `urls` to a Python list
    urls = df.urls.tolist()

    for url in urls:
        schedule('get_url', url)


@subtask
def get_url(url):
    ...
There are many other ways to read file data using Python
Readypipe makes it easy for your project to start by reading data from an uploaded file (like a CSV).
Using the Jupyter file browser, you can upload a file using the up-arrow button. The file can then be read using Python code.
Upload files:
The pandas third party library provides a convenient method for reading CSV data.
Simply import read_csv(filename) from pandas and call the method with the filename. This returns a dataframe object that you can convert into a list.
The example to the right shows how to convert a dataframe column (in the example, the column we're interested in is named urls) to a Python list. Items in the list are then added to a queue called get_url.
Testing major changes
##################
# in app.py file #
##################
from readypipe import starting_task, subtask, schedule


@starting_task
def schedule_scrape():
    # some starting_task work
    item_to_schedule = ...
    schedule('run_scrape', item_to_schedule)


@subtask
def run_scrape(item):
    # do something with the item
    ...

#################
# in a notebook #
#################
from readypipe import run_suite

# run the schedule_scrape task suite
# NOTE: you don't call schedule_scrape
# when passing it to run_suite
run_suite(schedule_scrape)
While highly scalable, the Readypipe production environment comes with constraints that can be frustrating when developing a new project or making significant changes to existing code.
Readypipe's run_suite method can help ease the transition between the development and production environments by enabling:
- Faster feedback cycles: it can take up to a few minutes to deploy and launch your code in the production environment.
run_suitelaunches immediately, though it is limited to a single worker thread - Data impermanence: it's not currently possible to fully remove production data once it's written. By writing to CSV files,
run_suitehelps you iterate on your project until you're confident in your logic
run_suite can only be run in the Workspace.
run_suite(starting_task_fn, max_items_to_process_per_queue=50)
| Parameter | Type | Description |
|---|---|---|
| starting_task_fn | function | A starting task to be called within run_suite. Any items scheduled by starting_task_fn will be processed by their respective subtasks up to the max items to process per queue limit |
| max_items_to_process_per_queue | integer | The maximum number of items (up to 1,000) to process per subtask queue |
Usage:
- Write a task suite (a starting_task + subtask set of functions) in app.py, just like you would in a typical project
- Pass the starting_task function (i.e., don't call the starting_task) to
run_suite
Effect:
The starting task function will be called within the run_suite function.
Any items scheduled by the starting_task will be processed one at a time by their respective subtasks. Items scheduled from within a subtask will be processed after all previous items have been processed.
Each subtask has a limit on the number of items that can be processed using run_suite. This limit defaults to 50 and cannot exceed 1,000. Any items remaining in the queue after the limit is reached will be included in the resulting data in an "unprocessed items" file.
Output:
After run_suite has finsihed, a new directory will be created in the project's file browser.
Data saved using the save and save_many methods will be written to a CSV file "{table_name}.csv".
Any items that were unsuccessfully processed will be written to an errors file "{subtask_name}_failed_items.csv".
Any remaining items (if any) will be written to a file "{subtask_name}_unprocessed_items.csv".
Execute code after a run
from readypipe import (
    starting_task, subtask, schedule,
    query, send_email, get_run_info)

# this function will be executed after the run
# since it's passed as kickoff's `after_run` argument.
# it queries collected data and sends it in an email
def email_collected_data():
    # get_run_info makes it easy to
    # pass data about the run to the
    # after_run function
    run_uuid = get_run_info()['run_uuid']
    collected_data = query(f"""
        SELECT * FROM my_table
        WHERE run_uuid = '{run_uuid}'
    """)
    send_email(
        'target-email-address@domain.com',
        subject_line=f'Run {run_uuid} has completed!',
        body=f'Data collected in run: {run_uuid}',
        dataframe=collected_data
    )

@starting_task(after_run=[email_collected_data])
def kickoff():
    # some starting_task work
    item = ...
    schedule('process_items', (item, ))


@subtask
def process_items(item):
    # some subtask work
    data = {'my_field': my_value, ...}
    save('my_table', data)
Every Readypipe starting task assigns the same run identifier to all items processed as part of a run.
Readypipe can therefore check if a given run has finished and then optionally run arbitrary code the user has defined.
Users can set code to execute after a run has finished by defining one or more functions and passing them in a list to the starting_task decorator when the run is kicked off.
The designated functions will run only once all items have been processed as part of the run and all data collected during the run is available in the database.
This Readypipe feature enables a number of useful behaviors:
- Querying the collected data and emailing the results to a user (as shown in the example to the right)
- Kicking off a new, distinct run that depends on the data from the previous run being available in the database
- Executing a series of QA checks against the data to ensure it conforms with expected results
Using after_run
A given run is considered finished when two conditions have been met:
- No additional items with the target run_uuid remain in any of the queues
- All data saved as part of the run is available to query in the database
When a starting_task is called with an after_run argument, Readypipe will automatically poll each queue to see if it contains any items associated with the run_uuid set when the starting_task kicks off.
Readypipe will also automatically handle the bookkeeping of items saved as part of the run.
Once all queues have been exhausted of items from the run and all data collected as part of the run is available to query, the functions passed to after_run will be executed in the order in which they were passed. The user doesn't need to add any additional code to enable this behavior.
get_run_info
The helper function get_run_info (imported from the readypipe library) also exposes the run_uuid of the run in a dictionary so it can be accessed in after_run functions. In the future, additional metadata about a run may also be exposed by the get_run_info function.
Combining get_run_info with after_run lets you limit the queried data to that collected in the run, without needing to lookup the latest run_uuid in a separate query.
Data and Databases
Saving to a database
# this code should be in: app.py
from readypipe import starting_task, save

@starting_task
def save_data():
    # some Python code to organize the
    # data you want to write to the db
    ...
    data = {'column_name': column_value}
    save('table_name', data)
Once you've deployed a project, saving data to a database is easy with Readypipe.
Details on how to deploy a project are included in the Advanced Usage section of this guide.
After defining a starting_task or subtask in app.py, save data to a database using Readypipe's save method.
save(table_name, data)
| Parameter | Type | Description |
|---|---|---|
| table_name | string | The database table to write to |
| data | dictionary | The data to save. Keys will be used as column names |
Two columns are automatically added to every record saved:
id: a unique identifier for the recorddate_added: the date the record was saved
Database validation
from readypipe import save
import re

# helper function to convert a column or table
# name to a valid column or table name.
def coerce_valid_db_name(text):
    # save accepts only lowercase characters
    text = text.lower()
    # replace spaces with underscores
    text = text.replace(' ', '_')
    # remove any invalid characters
    text = re.sub(r'[^a-z0-9_]', '', text)
    return text

BAD_COLUMN_NAME = 'Bad Column 1!'
# errors because of invalid column name
save('my_table', {BAD_COLUMN_NAME: 'foo'})

# works because column name is now valid
GOOD_COLUMN_NAME = coerce_valid_db_name(BAD_COLUMN_NAME)
# GOOD_COLUMN_NAME = 'bad_column_1'
save('my_table', {GOOD_COLUMN_NAME: 'foo'})
Readypipe performs two types of database validation at runtime, validating both table and column names.
The validation scheme is simple: only lowercased alphanumeric characters and underscores (no spaces) are allowed.
This validation happens when a table name is passed to the save and save_many functions, and also when a new column name is passed as an argument of saved data.
Saving items in bulk
from readypipe import (
    requests, starting_task, save_many)

@starting_task
def save_many_urls():
    response = requests.get('https://json-example.com')
    data = response.json()
    many_urls = data['urls']
    many_names = data['names']

    bulk_result = []
    # be careful with zip:
    # zipped lists should have the same length
    for url, name in zip(many_urls, many_names):
        item = {'url': url, 'name': name}  # each item will be (url, name)
        bulk_result.append(item)

    save_many('items_table', bulk_result)
As with schedule_many(), you can see significant performance benefits by writing many items to a database table in bulk rather than one-by-one.
save_many(table_name, data)
| Parameter | Type | Description |
|---|---|---|
| table_name | string | The database table to write to |
| data | list of dictionaries | A list of dictionaries containing the data to save. Keys will be used as column names |
A number of columns are automatically added to every record saved:
id: a unique identifier for the recorddate_added: the date and timestamp of when the record was saveddt: the date of when the record was savedrun_uuid: a unique identifier added to any records saved as part of a single starting task runpop_uuid: a unique identifier added to records saved as part of a single subtask run
A few notes on these columns:
- id, date_added and dt are reserved fields in Readypipe. The save() method will not allow those keys in data and will raise an error if they're included
- run_uuid and pop_uuid columns can be overwritten by the user, but you probably shouldn't do this unless you have a good reason
- pop_uuid will be None in the output of a starting_task; this is because pop_uuid is only generated in a subtask
Organizing collected data
By scrape
After deploying your project, we've found it's helpful when analyzing the data to have a convenient way of knowing which data was observed in each starting task run.
To help with this, the run_uuid field is added to saved data automatically.
Each time a project run starts (either on a schedule or immediately), a unique identifier is generated for that run and added as a field to any data saved during that run.
This makes it easy to distinguish what data was observed in each distinct run execution, as you'll have a consistent identifier to use.
By subtask item
It can sometimes be useful to know which data was observed in each subtask item processed. This is particularly helpful when debugging your code.
The pop_uuid field is added to saved data automatically and can be joined with the pipeapp_filter_results metadata table to assist with debugging.
Each time a subtask reads an item from a queue and processes it, a unique identifier is generated for that item and added as a field to any data saved.
This makes it easy to distinguish what data was observed with each item processed.
Testing tasks that save data
As with the schedule() method, when testing starting_tasks or subtasks that call the save() method in a Notebook, any items passed to save() will appear in the output below the cell.
Querying data
from readypipe import query

# dataframe=False returns a list of rows
item_table_rows = query(
    'SELECT * FROM items_table LIMIT 10',
    dataframe=False
)

for row in item_table_rows:
    field_value = row['field_name']
    ...
The query method
Readypipe provides the query method to view and analyze database data for a deployed project in a Notebook.
You can access table data for a deployed project using the method:
query(query_str, dataframe=True)
| Parameter | Type | Description |
|---|---|---|
| query_str | string | A SQL query string defining what data should be fetched |
| dataframe | boolean | Defaults to True, which returns a Pandas dataframe object. If False, returns a list of SQLAlchemy RowProxys. |
from readypipe import query

items_df = query('SELECT * FROM items_table LIMIT 1',
    dataframe=True)

print(items_df)
A useful query for viewing the names of the columns in your database table is included in the example to the right. This will query a single row from your database table and return the row as a DataFrame object.
Notebook queues and tables
As mentioned in the section on Virtual Queues and Tables, scheduling and saving data in a notebook adds items to queues and tables in memory only (as Pandas DataFrame objects).
Readypipe's get_queue and get_table methods can interact with these dataframes when needed.
More information on using get_table in simple projects can be found in this documents FAQ section.
Analyzing data in Pandas
Pandas DataFrames are a very powerful tool to have in your analytical toolkit.
The specifics of analyzing data using Pandas is out of scope for this guide, though more information can be found in this brief guide.
Several members of the Readypipe team are knowledgable in using Pandas to analyze data - for assistance or specific questions, please contact the support team at support@readypipe.io.
Writing data to files
Writing to a CSV file
from readypipe import query_to_csv

# For data stored in a Readypipe database
# from a Deployed project
query_to_csv(
    'SELECT * FROM items_table LIMIT 10',
    'item_table_data.csv')
It's easy to write your data to a CSV using the query_to_csv method.
query_to_csv(query_str, filename)
| Parameter | Type | Description |
|---|---|---|
| query_str | string | A SQL query string defining what data should be fetched |
| filename | string | The filename to use when writing the file. Note: don't forget to include ".csv" in the filename! |
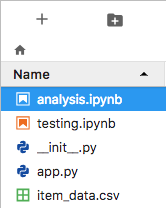
If the data you want to write to a file is already stored in a Readypipe database (a deployed project wrote to a table), you can query it using the query_to_csv method.
Once it's written, the file will appear in the File Browser on the left.
File Browser with a CSV:
# To write a JSON file:
import pandas as pd

# For data NOT stored in Readypipe,
# you can create a Pandas DataFrame
# by passing a list of dictionaries
# where the field names are keys
item_data = [
    {'field1': 'val1', 'field2': 'val2'},
    {'field1': 'val3', 'field2': 'val4'},
    ...
]

dataframe = pd.DataFrame.from_records(item_data)

dataframe.to_csv('item_data.csv')
You can also write files with data not already stored in Readypipe.
One common approach is to create a list of dictionaries with keys as the column names. Using Pandas' DataFrame.from_records() method, you can create a dataframe and use the same pattern to write a CSV.
Writing to a JSON file
from readypipe import query

# For data stored in a Readypipe database
# from a Deployed project:
# 1) Query the data (returns a DataFrame by default)
data = query("SELECT * FROM items_table LIMIT 10")

# 2) Write the DataFrame to a JSON file
data.to_json('my_json_file.json')
It's a two step process to write your data to a JSON file, but it's still very simple.
If the data you want to write to a file is already stored in a Readypipe database, you can query it as you normally would and call .to_json on the resulting DataFrame.
Once it's written, the file will appear in the File Browser on the left as it does when writing a CSV file.
Common CSV data issues
# To load CSV data into Pandas
# to validate this issue relates
# to Excel and not the data itself:
import pandas as pd

df = pd.read_csv('path_to_csv_file.csv')
# view the first 10 records of the data
df.head()
# or view the first N records of the data
N = 100
df.head(N)
Occasionally, Microsoft Excel loads CSV data improperly in a spreadsheet.
This often results in users thinking there's something wrong with the data, when in fact it's really an issue with Excel.
To verify if there's really something wrong with the underlying data, we recommend loading the data in a separate tool (as a Pandas DataFrame, using Readypipe's query method, or more robust data analysis software like Tableau or Alteryx).
As long as your data looks correct in this second tool, rest assured there's nothing wrong with the data in the CSV file; it's simply an issue with the way Excel displays this data.
Database best practices
When deciding what data to write to a database, it's often best to only write "objective" (observed) data.
For example, when collecting price data from a site in a foreign currency, it's often better to record the price, the observation date and the currency rather than converting the price into your preferred currency before writing it to the database.
Another common use case is cleaning strings and converting them to numbers. If you collect a "quantity sold" field from a marketplace website, stripping out the digits and storing the result as an integer can work in some scenarios but cause problems in others:
- It can be dangerous to clean data before writing it to the database!
- Safe: '9,550' -> 9550
- Dangerous!: '10,000+' -> 10000
Your database is most useful when it serves as a source of truth. Saving raw data and transforming the data afterwards using Python or SQL makes it easy to correct for issues or mistakes after the fact. If you transform the data before saving it to the database, it's difficult to reverse that transformation later on.
Alternatively, you could also save both the raw and transformed data in the database. This way if you need to refer back to the original data, it's not lost.
Table schemas
All Readypipe data is saved in SQL tables, backed by data stored in Apache Parquet format.
When data is written to a new table using the save or save_many functions, Readypipe will examine the first batch of incoming rows to determine the table's schema (its column names and data types).
Likewise, when new columns are added to an existing table, Readypipe will determine the types for the new columns based on the incoming data and add those columns to the table schema. Columns cannot be deleted from a table, and the types of columns cannot change.
Column type errors
Occasionally, a project will attempt to write data that cannot be automatically coerced to the data type defined for its column in the table schema.
This typically happens when the raw data returned by a request initially comes back as one type and then is returned as another type in a subsequent run. For example, a table may have a column, price, that initially contained only integer values, i.e., 100, 199, etc. Later the website may begin returning string values for this data point, such as "$100.00", "199 dollars", etc.
Readypipe will be unable to write the new rows to the existing table, because those values cannot be automatically cast to an interer type. When this happens, Readypipe will save the rows to a separate table, named <TABLE_NAME>_rp_errors, where save/save_many.
The _rp_errors table will be replica of the original table, but with every column defined as a string type. By querying from both the original table and its _rp_errors equivalent, it is possible to see all of the rows written to the table, including those that failed due to a data type mismatch. Going forward, new failed rows can be avoided by changing the parsing logic for the failing column or saving the data to a new column.
Failed Items
Failed items queue
from readypipe import starting_task, subtask, requests, schedule

@starting_task
def schedule_request():
    # some work done by the starting_task
    ...
    schedule('enqueue_on_fail', url)
    schedule('drop_on_fail', url)

# after 3 attempts, an item `url` will
# be moved to the Failed Items queue
@subtask(max_attempts=3)
def enqueue_on_fail(url):
    response = requests.get(url)
    ...

# after 3 attempts, an item `url` will
# be dropped altogether
@subtask(max_attempts=3, drop_failed_items=True)
def drop_on_fail(url):
    response = requests.get(url)
    ...
By default, Readypipe retries a subtask when an item encounters an unhandled exception. In certain cases, you may want to limit the number of times an item is retried to a maximum (for example, if a site returns a 404 status code because a page no longer exists).
The max_attempts subtask argument enables a user to limit the number of attempts. After the number of attempts of an item is met, the item is automatically moved to the "Failed Items" queue (a separate and distinct queue from the "Primary" queue).
When an item is moved to the Failed Items queue, a corresponding record will be added to the pipeapp_failed_items table; this can be helpful for understanding what items consistently fail over time.
The max_attempts argument doesn't currently have a default value, but this may be changed in the near future to support additional Readypipe functionality.
Items in the Failed Items queue will not be retried, but will be housed in that queue for a time until they are either (i) restored to the Primary queue or (ii) cleared and removed from the queue. Information on interacting with the queue can currently be found in the API section.
Dropping failed items
Alternatively, failed items can be dropped entirely after max attempts are met with a given item.
This can be done via the drop_failed_items subtask argument. When drop_failed_items=True, items will be removed from the Primary queue and dropped entirely.
The drop_failed_items argument defaults to False, as many users prefer this behavior to dropping failed items entirely.
Debugging Tables
# debugging tables can be queried as below
from readypipe import query

# insert the desired SQL string between
# the triple quote marks
query("""
    <INSERT SQL STRING HERE>
""")
The general pattern for querying debugging tables
Readypipe automatically logs debugging records as a project is kicked off and as data flows through the different components of the system.
This can be very helpful when first building a project or debugging project issues.
Records are stored in four primary debugging tables, all accessible in the Workspace environment using the query method:
- pipeapp_appends
- pipeapp_run_results
- pipeapp_http_requests
- pipeapp_filter_results
- pipeapp_failed_items
There are two additional debugging tables we have historically logged to that are present in each Readypipe project, though their respective _results tables encompass the data contained in each and will not be a focus of this section:
- pipeapp_filter
- pipeapp_run
Overview
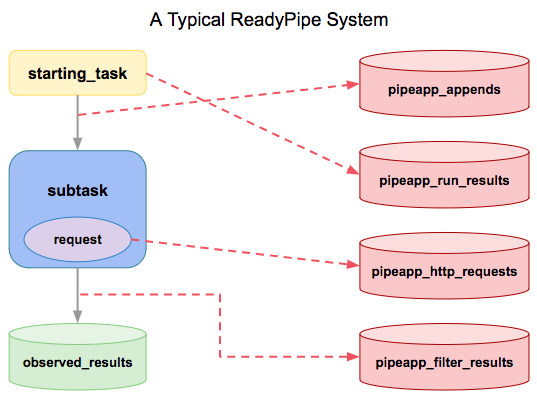
The purpose of the debugging tables is to provide visibility into Readypipe data collection systems. These tables are populated at various stages of a data collection system.
Starting tasks, subtasks, and requests all trigger events that insert records into their respective logging tables.
observed_tables are defined by the user and created via the save method
pipeapp_appends
from readypipe import query

query("""
    SELECT *
    FROM pipeapp_appends
    WHERE call_uuid = '<call_uuid>'
    AND dt >= date '2018-12-01'
    ORDER BY date_added DESC
""")
Returns items scheduled to a queue from a specific task run
Contains information about items passed between tasks (via schedule).
Either the run_uuid or the pop_uuid fields, automatically added to each record saved by the user in observed_data, can be joined to the call_uuid field in this table. This can be particularly helpful in debugging.
Selected columns and descriptions:
id: an unique UUID for every rowcall_uuid: therun_idorpop_idassociated with the schedule attemptcall_type: eitherentry_command(astarting_task) orapp_filter(asubtask)caller_name: name of the task the item was scheduled fromname: name of the task the item is scheduled todate_scheduled: the date and timestamp of when the item will be ready to be processedscore: the epoch time integer representing when the item will be ready to be processed (a more machine-friendly version ofdate_scheduled)input: the data passed to the filter as a textual json array, where each position corresponds to one of the filter parameters. For example, if the filter was called with the stringfooand the integer9, the value in this column will be["foo", 9]bundled_data: metadata not explicitly in the input, but associated with the item (likerun_uuid)date_added: the date and timestamp of when the input was scheduled to the queuedt: the date of when the record was added to the tablerun_uuid: an unique UUID for thestarting_taskrun
Filtering results on the dt field in your queries can significantly improve the speed of execution for large tables.
pipeapp_run_results
from readypipe import query

query("""
    SELECT *
    FROM pipeapp_run_results
    WHERE command = '<starting_task_name>'
    AND dt >= date '2018-12-01'
    ORDER BY date_added DESC
""")
Returns the most recent runs for a starting_task
Contains information about starting_task executions.
The run_uuid field, automatically added to each record saved by the user in observed_data, can be joined to the run_uuid field in this table. This can be particularly helpful in debugging.
Selected columns and descriptions:
id: an unique UUID for every rowrun_uuid: an unique UUID for thestarting_taskruncommand: the name of thestarting_taskcalledexception_type: the raised exception class (BadGatewayError)exception_message: the message associated with the exceptiondate_added: the date and timestamp of when the starting_task finished executingelapsed_sec: the number of seconds (float) it took the task to executedt: the date of when the record was added to the table
Filtering results on the dt field in your queries can significantly improve the speed of execution for large tables.
pipeapp_http_requests
from readypipe import query

query("""
    SELECT *
    FROM pipeapp_http_requests
    WHERE error LIKE '%ReadTimeoutError%'
    AND dt >= date '2018-12-01'
    ORDER BY date_added DESC
""")
Returns requests that resulted in a ReadTimeout.
from readypipe import query

query("""
    SELECT COUNT(*) AS errored_requests, proxy_region
    FROM pipeapp_http_requests
    WHERE error IS NOT NULL
    AND dt >= date '2018-12-01'
    GROUP BY proxy_region
""")
Helps you understand if errors are specific to a proxy region. For example, some errors are more common for proxies located in China
Contains information about each request made with readypipe.requests and readypipe.open_browser.
Selected columns and descriptions:
id: an unique UUID for every rowurl: the URL requestedfinal_url: the final URL served, after any redirectscall_type: eitherentry_command(astarting_task) orapp_filter(asubtask) where the request occurredcall_uuid: therun_idorpop_idassociated with the request attempterror: the error message of any error encountered in the requestdate_accessed: the date and timestamp of the requestmethod: the type of request (GET, POST, etc.)proxy_ip: the IP address of the proxy used in the requestproxy_region: the geographic region where the proxy is located (US, China, etc.)proxy_provider: the service provider of the proxytask_name: the name of the task making the requeststatus: the HTTP status code of the responsedate_added: the date and timestamp of when the record was added to the tabledt: the date of when the record was added to the tablerun_uuid: an unique UUID for thestarting_taskrunheaders: the specific headers (including User Agent) passed when making the request
Filtering results on the dt field in your queries can significantly improve the speed of execution for large tables.
pipeapp_filter_results
from readypipe import query

query("""
    SELECT *
    FROM pipeapp_filter_results
    WHERE name = '<subtask_name>'
    AND exception_type IS NOT NULL
    ORDER BY date_added DESC
""")
Returns all of the most recent exceptions for a subtask
Contains information about subtask executions.
The pop_uuid field, automatically added to each record saved by the user in observed_data, can be joined to the pop_uuid field in this table. This can be particularly helpful in debugging.
Selected columns and descriptions:
id: an unique UUID for every rowpop_uuid: an unique UUID for the item read from the queuename: name of the subtask processing the input iteminput: the data passed to the filter as a textual json array, where each position corresponds to one of the filter parameters. For example, if the filter was called with the stringfooand the integer9, the value in this column will be["foo", 9]bundled_data: metadata not explicitly in the input, but associated with the item (likerun_uuid)exception_type: the raised exception class (BadGatewayError)exception_message: the message associated with the exceptiondate_added: the date and timestamp of when the subtask finished processing the input itemelapsed_sec: the number of seconds (float) it took the task to executedt: the date of when the record was added to the tablerun_uuid: an unique UUID for thestarting_taskrun
Filtering results on the dt field in your queries can significantly improve the speed of execution for large tables.
pipeapp_failed_items
from readypipe import query

query("""
    SELECT *
    FROM pipeapp_failed_items
    WHERE source_queue_name = '<subtask_name>'
    ORDER BY date_added DESC
""")
Returns all items moved to the failed items queue from a subtask with max_attempts enabled
Contains information about items moved to the failed items queue after a consecutive number of failed attempts for subtasks with max_attempts enabled.
The pop_uuid field, automatically added to each record saved by the user in observed_data, can be joined to the pop_uuid field in this table. This can be particularly helpful in debugging.
Selected columns and descriptions:
id: an unique UUID for every rowrun_uuid: an unique UUID for the starting_task runpop_uuid: an unique UUID for the item read from the queuesource_queue_name: the queue in which the item failed to process successfullyinput: the failed input itemattempts: the number of consecutive failed attempts before being moved to the failed items queuebundled_data: metadata not explicitly in the input, but associated with the item (like run_ uuid)final_exception_type: the final exception before the item was movedfinal_exception_message: the message of the final exception before the item was movedfinal_exception_file: the file of the final exception before the item was movedfinal_exception_line: the line of the final exception before the item was moveddate_added: the date and timestamp of when the record was added to the tabledt: the date of when the record was added to the table
Filtering results on the dt field in your queries can significantly improve the speed of execution for large tables.
Readypipe API
Introduction
Readypipe has a RESTful API allowing you to perform operations such as reading, modifying, adding or deleting data from your organization.
Authentication
# example User resource object
{
    "id": "my-unique-user-id",
    "email": "me@domain.com",
    # `api_key` is used for authorization
    "api_key": "my-unique-api-key",
    "organization": "my organization"
}
Before you can interact with the Readypipe API, you need to authenticate or "log in" in the same way you might log in to the Readypipe website.
You can find your personal API key here: https://app.readypipe.io/api/v1/users.
Your API key will allow you to interact with different resources in your organization, such as users, projects, tasks, etc.
Users belong to a single organization, and users outside of your organization cannot interact with resources inside it.
Making requests to the API
import requests

my_api_key = 'MY-UNIQUE-API-KEY'
requests.get(
    'https://app.readypipe.io/api/v1/projects/',
    headers={'Authorization': f'Token {my_api_key}'}
).json()
When making a request to the Readypipe API you must pass an Authorization header in each request, with a value of Token YOUR-UNIQUE-API-KEY.
The API will return JSON objects representing the specified resource.
Projects
A project typically contains a set of web scraping functions ("tasks") organized in an app.py file. A project is scoped to a single organization and can only be viewed and interacted with by users also in that organization.
Project list
# list projects in your organization
import requests

my_api_key = 'MY-UNIQUE-API-KEY'
requests.get(
    'https://app.readypipe.io/api/v1/projects/',
    headers={'Authorization': f'Token {my_api_key}'}
).json()

# Response
[
    {
        'id': 'my-project-uuid1',
        'name': 'My Project 1',
        'status': 5,
        'database_schema': 'my_project_1_observed_rp'
    },
    {
        'id': 'my-project-uuid2',
        'name': 'My Project 2',
        'status': 5,
        'database_schema': 'my_project_2_observed_rp'
    }
]
List all projects in the user's organization.
GET: /api/v1/projects/
| Response Attribute | Type | Description |
|---|---|---|
| id | string | A universally unique id associated with the project |
| name | string | The name of the project, displayed on the homepage |
| status | integer | A number representing the status of the project (Archived: 1, Hibernated Notebook: 4, Active: 5) |
| database_schema | string | The schema where the data for the project is located. Useful for querying data across projects |
Project detail
# get project details
import requests

my_api_key = 'MY-UNIQUE-API-KEY'
requests.get(
    'https://app.readypipe.io/api/v1/projects/my-project-uuid/',
    headers={'Authorization': f'Token {my_api_key}'}
).json()

# Response
{
    'id': 'my-project-uuid',
    'name': 'My Project 1',
    'status': 5,
    'data': {
        # contains queryable Parquet data
        's3': 'https://path-to-my-readypipe-s3-bucket',
        # database_schema is useful for querying data across projects
        'database_schema': 'my_project_1_observed_rp',
    }
}
Get details on a single project.
GET: /api/v1/projects/<project_id>/
| Response Attribute | Type | Description |
|---|---|---|
| id | string | A universally unique id associated with the project |
| name | string | The name of the project, displayed on the homepage |
| status | integer | A number representing the status of the project (Archived: 1, Hibernated Notebook: 4, Active: 5) |
| data | dictionary | Contains information on the location of data collected in the project, including it's S3 bucket location and the schema name |
| > s3 | string | The S3 bucket loctation of the data |
| > database_schema | string | The schema where the data for the project is located. Useful for querying data across projects |
Project file version list
# list project file versions
import requests

my_api_key = 'MY-UNIQUE-API-KEY'
requests.get(
    'https://app.readypipe.io/api/v1/projects/my-project-uuid/files/development/',
    headers={'Authorization': f'Token {my_api_key}'}
).json()

# Response
{
    'project_id': 'my-project-uuid',
    'files': [
        {
            'filename': 'app.py',
            'versions': [
                {
                    'version_id': 'version-hash-2',
                    'modified': '2019-04-02 00:00'
                },
                {
                    'version_id': 'version-hash-1',
                    'modified': '2019-04-01 00:00'
                }
            ]
        }
    ]
}
List all file versions for a project.
GET: /api/v1/projects/<project_id>/files/<environment>/
Environment can be either: development or production
| Response Attribute | Type | Description |
|---|---|---|
| project_id | string | A universally unique id associated with the project |
| files | list | List of all files in the specific environment since project creation |
| > filename | string | Name of the file |
| > versions | list | Contains information on each file version |
| >> version_id | string | A universally unique id associated with the file version |
| >> modified | string | Timestamp of what the file version was last modified |
Project file version details
# get file version details
import requests

my_api_key = 'MY-UNIQUE-API-KEY'
requests.get(
    'https://app.readypipe.io/api/v1/projects/my-project-uuid/files/development/versions/app.py/version-hash-2/',
    headers={'Authorization': f'Token {my_api_key}'}
).json()

# Response
{
    'project_id': 'my-project-uuid',
    'file_version': {
        'id': 'version-hash-2',
        'content': 'from readypipe import requests...',
        'modified': '2019-04-02 00:00',
    }
}
Get details on a specific file version, including it's full content.
GET: /api/v1/projects/<project_id>/files/<environment> \
/versions/<filename>/<file_version_id>/
Environment can be either: development or production
| Response Attribute | Type | Description |
|---|---|---|
| project_id | string | A universally unique id associated with the project |
| file_version | dictionary | Information on a single file version |
| > id | string | A universally unique id associated with the file version |
| > content | string | Content of the file at this version in time |
| > modified | string | Timestamp of what the file version was last modified |
Upload file to project
# upload file to project
import requests
import json

my_api_key = 'MY-UNIQUE-API-KEY'
requests.put(
    'https://app.readypipe.io/api/v1/projects/my-project-uuid/files/development/app.py/',
    headers={
        'Authorization': f'Token {my_api_key}',
        # requires the 'Content-Type': 'application/json' header
        'Content-Type': 'application/json',
    },
    # data to put must be in JSON format
    data=json.dumps({'file': 'from readypipe import requests...'})
).json()

# Response
{'id': 'my-new-file-version-id'}
Upload a file to a project.
PUT: /api/v1/projects/<project_id>/files/<environment>/<filename>/
Environment can be either: development or production
| Request Data Parameters | Type | Description |
|---|---|---|
| file | string | A JSON encoded string content of the file to upload |
Also useful for restoring previous versions of files:
- Fetch an older version of a file
- Parse the
contentfrom the response - Create a dictionary to pass in the PUT request:
{'file': content} - Execute the PUT request to restore the previous version
In a future release, an API endpoint for redeploying code to production will enable users to programmatically upload new files and push to currently running systems.
Deploy code to Production
# deploy code to production
import requests

my_api_key = 'MY-UNIQUE-API-KEY'
requests.post(
    'https://app.readypipe.io/api/v1/projects/my-project-uuid/deploy/',
    headers={
        'Authorization': f'Token {my_api_key}',
        'Content-Type': 'application/json',
    }).json()

# Response
{}
Deploy the current versions of Workspace files (in the Development environment) to the Production environment.
POST: /api/v1/projects/<project_id>/deploy/
| Request Data Parameters | Type | Description |
|---|---|---|
| project_id | string | A universally unique id associated with the project |
Rename project
# rename a project
import requests

my_api_key = 'MY-UNIQUE-API-KEY'
requests.patch(
    'https://app.readypipe.io/api/v1/projects/my-project-uuid/',
    headers={
        'Authorization': f'Token {my_api_key}',
        'Content-Type': 'application/json',
    },
    data=json.dumps({
        'name': 'my_new_name'
        })
).json()

# Response
{
    'id': 'my-project-uuid',
    'name': 'My Project 1',
    'status': 5,
    'data': {
        # contains queryable Parquet data
        's3': 'https://path-to-my-readypipe-s3-bucket',
        # database_schema is useful for querying data across projects
        'database_schema': 'my_project_1_observed_rp',
    }
}
Rename a project that already exists.
PATCH: /api/v1/projects/<project_id>/
| Request Data Parameters | Type | Description |
|---|---|---|
| project_id | string | A universally unique id associated with the project |
| name | string | A name to set for the project. |
Archive project
# archive or hibernate a project
import requests

my_api_key = 'MY-UNIQUE-API-KEY'
requests.patch(
    'https://app.readypipe.io/api/v1/projects/my-project-uuid/',
    headers={
        'Authorization': f'Token {my_api_key}',
        'Content-Type': 'application/json',
    },
    # set status to 1 to archive the project
    data=json.dumps({
        'status': 1
        })
).json()

# Response
{
    'id': 'my-project-uuid',
    'name': 'My Project 1',
    'status': 1,
    'data': {
        # contains queryable Parquet data
        's3': 'https://path-to-my-readypipe-s3-bucket',
        # database_schema is useful for querying data across projects
        'database_schema': 'my_project_1_observed_rp',
    }
}
Archive a project. Removes the project from the UI and deletes the associated AWS resources.
Does not remove code or data associated with the project. Projects can be restored from the archive by patching the status back to 5.
PATCH: /api/v1/projects/<project_id>/
| Request Data Parameters | Type | Description |
|---|---|---|
| project_id | string | A universally unique id associated with the project |
| status | integer | A number representing the status of the project (Archived: 1, Hibernated Notebook: 4, Active: 5) |
Tasks
Tasks typically do the work in each project. Starting tasks kick off a project and can be scheduled to run with a specific frequency (or at a given time), while subtasks read items off of a queue and can process queue items concurrently (in parallel).
Task list
import requests

my_api_key = 'MY-UNIQUE-API-KEY'
requests.get(
    'https://app.readypipe.io/api/v1/projects/my-project-uuid/tasks/',
    headers={'Authorization': f'Token {my_api_key}'}
).json()

# Response
{
    'starting_tasks': [
        {
            'id': 'my-starting-task-id',
            'name': 'my_starting_task',
            'frequency': '0 0 * * *',
            'next_run': '2019-05-01T00:00:00',
            'status': 'launching',
            'currently_running': [{
                'aws_id': 'my-aws-id',
                'status': 'launching',
                'desired_ecs_status': 'RUNNING',
                'last_ecs_status': 'PROVISIONING',
                'started_at': None,

            }],
        }
    ],
    'subtasks': [
        {
            'id': 'my-subtask-id',
            'name': 'my_subtask',
            'concurrency': 1,
            'queue': {
                'size': 100,
            },
            'failed_items': {
                'size': 5,
            },
            'errors': {
                'size': 15,
            },
            'url': '/api/v1/projects/my-project-uuid/tasks/my-subtask-id/',
        }
    ]
}
GET: /api/v1/projects/<project_id>/tasks/
Tasks
| Response Attribute | Type | Description |
|---|---|---|
| starting_tasks | list | All the starting tasks in the project |
| subtasks | list | All the subtasks in the project |
Typical projects frequently have both starting tasks and subtasks.
Starting tasks
| Response Attribute | Type | Description |
|---|---|---|
| id | string | A universally unique id associated with the starting task |
| name | string | The name of the starting task (as defined in app.py) |
| frequency | string | The frequency with which the starting task should run (in cron notation) |
| next_run | string | The human-readable scheduled next run timestamp, as determined by frequency |
| status | string | The status of the starting task (unscheduled, scheduled, launching, running) |
| currently_running | list | A list of dictionaries representing currently running instances of the starting_task |
| > aws_id | string | The AWS unique identifier for the running task |
| > status | string | The Readypipe status of the running task |
| > desired_ecs_status | string | The desire AWS status of the running task |
| > last_ecs_status | string | The latest AWS status of the running task |
| > started_at | string | The timestamp of when the task began running |
Subtasks
| Response Attribute | Type | Description |
|---|---|---|
| id | string | A universally unique id associated with the subtask |
| name | string | The name of the subtask (as defined in app.py) |
| concurrency | int | The number of workers available to process items from the queue |
| queue | dictionary | Contains information on the queue, such as the number of items in it |
| failed_items | dictionary | Contains information on the failed items queue, such as the number of items in it |
| errors | dictionary | Contains information on the unhandled errors encountered in the project |
| url | string | The URL of the subtask detail view |
Launch starting task
import requests
import json

my_api_key = 'MY-UNIQUE-API-KEY'
requests.post(
    'https://app.readypipe.io/api/v1/projects/my-project-uuid/tasks/my-starting-task-id/run/',
    headers={
        'Authorization': f'Token {my_api_key}',
        'Content-Type': 'application/json',
    },
    data=json.dumps({
        'project_id': 'my-project-uuid',
        'task_id': 'my-starting-task-id',
        'args': ['my_starting_task_argument'],
    })
).json()

# Response
{
    'project_id': 'my-project-uuid',
    'task_id': 'my-starting-task-id',
}
Launches a starting task. If your starting task is defined to take arguments, you can optionally pass arguments to the starting task at launch time.
POST: /api/v1/projects/<project_id>/tasks/<task_id>/run/
| Request Data Parameters | Type | Description |
|---|---|---|
| project_id | string | A universally unique id associated with the project |
| task_id | string | A universally unique id associated with the starting task to launch |
| args | list | An optional list of positional arguments to pass to the starting task when launching. Requires the starting task to take positional arguments in the task definition |
Stop a running starting task
import requests
import json

my_api_key = 'MY-UNIQUE-API-KEY'
requests.post(
    'https://app.readypipe.io/api/v1/projects/my-project-uuid/tasks/my-starting-task-id/stop/',
    headers={
        'Authorization': f'Token {my_api_key}',
        'Content-Type': 'application/json',
    },
    data=json.dumps({
        'project_id': 'my-project-uuid',
        'task_id': 'my-starting-task-id',
    })
).json()

# Response
{
    'project_id': 'my-project-uuid',
    'task_id': 'my-starting-task-id',
    'stopped_tasks': [
        {
        'started_at': '2019-05-01T15:00:00',
        'stopped_at': '2019-05-01T15:00:15',
        'aws_id': 'my-aws-id',
        }
    ]
}
Stops all running instances of a starting task.
POST: /api/v1/projects/<project_id>/tasks/<task_id>/stop/
| Request Data Parameters | Type | Description |
|---|---|---|
| project_id | string | A universally unique id associated with the project |
| task_id | string | A universally unique id associated with the starting task to stop |
Update starting task frequency
import requests
import json

my_api_key = 'MY-UNIQUE-API-KEY'
requests.patch(
    'https://app.readypipe.io/api/v1/projects/my-project-uuid/tasks/my-starting-task-uuid/',
    headers={
        'Authorization': f'Token {my_api_key}',
        'Content-Type': 'application/json',
    },
    data=json.dumps({
        'frequency': '0 12 * * *',
    })
).json()

# Response
{
    'id': 'my-starting-task-uuid',
    'name': 'my_starting_task',
    'frequency': '0 12 * * *',
}
Updates the scheduling of a specific starting task.
Currently also redeploys the app.py code in the Workspace at the time of the API call, though these two actions will be split into separate API endpoints in a future release.
PATCH: /api/v1/projects/<project_id>/tasks/<starting_task_id>/
| Request Data Parameters | Type | Description |
|---|---|---|
| frequency | string | A string representing a cron schedule to run the specified starting task on |
Update subtask concurrency
import requests
import json

my_api_key = 'MY-UNIQUE-API-KEY'
requests.patch(
    'https://app.readypipe.io/api/v1/projects/my-project-uuid/tasks/my-subtask-uuid/',
    headers={
        'Authorization': f'Token {my_api_key}',
        'Content-Type': 'application/json',
    },
    data=json.dumps({
        'concurrency': 5,
    })
).json()

# Response
{
    'id': 'my-subtask-uuid',
    'name': 'my_subtask',
    'concurrency': 5,
    'queue': {'items': [{...}], 'size': 100},
    'failed_items': {'items': [{...}], 'size': 5},
}
Updates the concurrency of a specific subtask.
Currently also redeploys the app.py code in the Workspace at the time of the API call, though these two actions will be split into separate API endpoints in a future release.
PATCH: /api/v1/projects/<project_id>/tasks/<subtask_id>/
| Request Data Parameters | Type | Description |
|---|---|---|
| concurrency | int | An integer representing the number of machines to spin up to concurrently process items from the spcified subtask queue |
Queues
There are two types of queues: the primary queue (also commonly referred to as simply the "queue") and the failed items queue.
The queue holds items that were scheduled to it by a prior task. As a subtask processes items from its queue, successfully processed items are then removed from the queue.
Items that cannot be processed successfully are treated in one of three ways: retried in the queue, moved to the failed items queue, or dropped. More information on this can be found in the Failed Items section.
You can currently perform two operations programmatically on both the queue and the failed items queue, and a third operation only on the failed items queue:
Inspect next 5 items
Clear queue
Restore (move failed items to primary queue for reprocessing)
Inspect next 5 items
import requests

my_api_key = 'MY-UNIQUE-API-KEY'
requests.get(
    'https://app.readypipe.io/api/v1/projects/my-project-uuid/tasks/my-subtask-uuid/queue/',
    headers={'Authorization': f'Token {my_api_key}'}
).json()

# Response
{
    'queue': {
        'size': 100,
        'items': [
            {
                'item': 'item1',
                # scheduled_time not present in failed items queue
                'scheduled_time': '2019-04-02T00:00:00',
            },
            ...
            {
                'item': 'item5',
                # scheduled_time not present in failed items queue
                'scheduled_time': '2019-04-02T00:05:00',
            },
        ]
    }
}
This action allows you to inspect the queue and see the next five items awaiting processing.
Inspecting the queue:
GET: /api/v1/projects/<project_id>/tasks/<subtask_id>/queue/
Inspecting the failed items queue:
GET: /api/v1/projects/<project_id>/tasks/<subtask_id>/queue/failed-items/
| Response Attribute | Type | Description |
|---|---|---|
| queue | dictionary | A dictionary containing information on the queue |
| > size | int | Total number of items waiting to be processed by the subtask |
| > items | list | Contains dictionaries with information on the next 5 items to be processed by the subtask |
| >> item | -- | The item passed to schedule |
| >> scheduled_time | string | Timestamp representing when the item is scheduled to be processed. Not present in Failed Items queue |
Clear queues programmatically
import requests

my_api_key = 'MY-UNIQUE-API-KEY'
requests.post(
    'https://app.readypipe.io/api/v1/projects/my-project-uuid/tasks/my-subtask-uuid/queue/clear/',
    headers={
        'Authorization': f'Token {my_api_key}',
        'Content-Type': 'application/json',
    },
    data={
        'project_id': 'my-project-uuid',
        'task_id': 'my-subtask-id',
    },
).json()

# Response
{
    'project_id': 'my-project-uuid',
    'task_id': 'my-subtask-id'
}
This action removes all items from the specified queue or failed items queue.
Clearing the queue:
POST: /api/v1/projects/<project_id>/tasks/<subtask_id>/queue/clear/
Clearing the failed items queue:
POST: /api/v1/projects/<project_id>/tasks/<subtask_id>/queue/failed-items/clear/
| Request Data Parameters | Type | Description |
|---|---|---|
| project_id | string | A universally unique id associated with the project |
| task_id | string | A universally unique id associated with the subtask queue (or failed items queue) being cleared |
Restore the queue
import requests

my_api_key = 'MY-UNIQUE-API-KEY'
requests.post(
    'https://app.readypipe.io/api/v1/projects/my-project-uuid/tasks/my-subtask-uuid/queue/failed-items/restore/',
    headers={
        'Authorization': f'Token {my_api_key}',
        'Content-Type': 'application/json',
    },
    data={
        'project_id': 'my-project-uuid',
        'task_id': 'my-subtask-id',
    }
).json()

# Response
{
    'project_id': 'my-project-uuid',
    'task_id': 'my-subtask-id'
}
This action moves all items from the specified subtask's failed items queue back to it's primary queue for reprocessing.
This can be helpful after changing your code to handle the specific error the item failed on.
Restore the failed items queue:
POST: /api/v1/projects/<project_id>/tasks/<subtask_id>/queue/failed-items/restore/
| Request Data Parameters | Type | Description |
|---|---|---|
| project_id | string | A universally unique id associated with the project |
| task_id | string | A universally unique id associated with the subtask failed items queue being restored |
FAQs + Best Practices
Handling Pagination
from readypipe import (
    requests, starting_task, schedule, schedule_many, subtask)


@starting_task
def get_search_result_first_page():
    # In the simplest case, a starting_task will
    # simply schedule processing of the 1st page
    schedule('get_search_results_page', (1, ))


@subtask
def get_search_results_page(page_num):
    response = requests.get(
        'https://example.com/search?page={}'.format(page_num))

    # Extract any data we want from this page
    links_to_process = response.html.xpath(
        '//a[contains(@class, "item-page")]/@href')

    # Schedule that data to be processed...
    schedule_many('process_links', links_to_process)

    # get the page number of the last page of results
    final_page_text = response.html.xpath(
        '//a[contains(@class, "last-page")/text()')

    # convert final_page_text to a number
    # if final_page_text has a comma in it,
    # you can strip out the comma as follows:
    # final_page_text = final_page_text.replace(',', '')
    final_page_int = int(final_page_text)

    # ...then increase page_num and add it
    # to a list of items to schedule
    pages_to_schedule = []
    while page_num < final_page_int:
        page_num += 1
        pages_to_schedule.append(page_num)

    # we use schedule_many here because when there
    # are a large number of items to schedule, the
    # performance improvement over schedule
    # is significant
    schedule_many('get_search_results_page', pages_to_schedule)


@subtask
def process_links(link):
    ...
There are several ways to handle website pagination.
A recommended approach is to leverage the fact that subtasks can schedule work to themselves.
In the most basic case, a starting_task will simply schedule a subtask to visit the first page of results. In this case the subtask will perform the same operations on each page, so we can reschedule the subtask to repeat itself until we run out of pages.
A more complex example might treat the first page and subsequent pages separately. You could handle this with a conditional in your task definition (if page_num == 1: ...), or by having one subtask process the first page, with subsequent pages being processed by a second subtask.
Extracting the "max page"
There are also various approaches for getting the pagination links themselves.
One approach uses an XPath to extract the URL of a "Next" button that frequently appears on the page, and will stop rescheduling itself only once that "Next" button is no longer present.
Another approach will try and extract a value for the "max page" and paginate until you reach that maximum. For example, if the first page displays text such as Page 1 of 100 pages, you can extract the 100 in your initial request and paginate until you reach page 100.
Handling pagination when collecting web data is somewhat of an art. For more information or other use case specific approaches, you can contact our support team at support@readypipe.io.
Differences in the first page URL
# normal page 1 URL:
first_page = requests.get('https://some-paginated-site.com')

# normal page 2 URL:
# note the ?page=2 query string parameter
second_page = requests.get('https://some-paginated-site.com/?page=2')

# modified page 1 URL normally gives
# you the same page as the normal URL:
still_first_page = requests.get('https://some-paginated-site.com/?page=1')
Website pagination is commonly handled using query string parameters.
These are optional parameters added to a URL that come after a question mark ? character.
A common web development pattern is to use ?page=2 (or some other query string parameter) for pages 2 - max, but to exclude this parameter on the first page.
A useful web scraping "trick" is to add ?page=1 manually to the URL - in many cases, you'll get the exact same page content as if you didn't include this page parameter.
Why this is helpful This approach can help keep your code clean, since you can handle navigating to each page of the website in the same way.
FAQs
from readypipe import requests, save, get_table

response = requests.get(
    'http://some-simple-json-site.com/products')

products = response.json()['products']

for product in products:
    save('products', {
        'name': product['name'],
        'url': product['url'],
    })

get_table('products').to_csv('scraped_products.csv')
My scraping project is very simple and I don't need the overhead of a database. Can I get data out of Readypipe using just a Notebook?
Sometimes, a scraping project is simple enough that you can make a few requests and collect all the data you need.
Using Readypipe's save (or save_many) method in a Python notebook, you can collect data from a site and display it in an easy-to-read format.
When you're satisfied with the output, use Readypipe's get_table method to interact with the underlying data in Python.
The get_table method (discussed further in the Notebook queues and tables section) takes the name of the table passed to save and returns a Pandas DataFrame object containing the table data.
To write the data to a file, simply call .to_csv('<<filename>>.csv') on the returned DataFrame. The file will be written to the file browser on the left of the Workspace.
# a trivial function returning a list
# of 100 million items
def return_list():
    large_list = []
    for i in range(100000000):
        large_list.append((i, ))
    return large_list


# a trivial generator function doing the
# same, but without overloading memory
def yield_list():
    for i in range(100000000):
        yield i

from readypipe import starting_task, schedule_many
@starting_task
def overloads_memory():
    large_list = return_list()
    schedule_many('my_subtask', large_list)

@starting_task
def memory_safe():
    schedule_many('my_subtask', yield_list())
I see "Killed python -m readypipe.runner ..." in my Deployment logs and my system doesn't seem to be running.
In Deployment, Readypipe uses machines with a few GBs of memory but this can sometimes be exceeded without you knowing.
If you see a message resembling the below screenshot, your machine likely ran out of memory while trying to execute a task. This frequently happens when a starting_task attempts to schedule too much data at once.

A few tactics can help you work around this memory constraint:
1) Use Python generators if possible
Simplistically, generators return an object that can be iterated over without loading all of the data into memory at once.
A very simple example of a generator is included to the right: in return_list, we have to first load all 100 million items into memory before returning them all at once. Alternatively, yield_list uses the yield keyword to only keep a small number of items in memory at any given time.
Note how we call the generator function as the second parameter of schedule_many. This is frequently the best way to implement this pattern.
Using generator functions allows you to schedule a large number of items without overloading Readypipe memory limits.
2) Distribute memory-intensive work into subtasks
Another tactic moves work that requires a lot of memory into subtasks. Though not as efficient as the generator approach, by distributing lots of memory-intensive work across many subtask machines, you're less likely to overwhelm the memory of a single machine.
I'm trying to replicate a request I see in the Network tab of my browser's Developer Tools, but can't figure out the correct parameters
We recommend using Trillworks to help with request debugging.
Once you've found the request you want to replicate, right click on that request and select "Copy" and "Copy as cURL" from the menu (Mac) or "Copy as cURL (Bash)" (Windows).
Screenshot of Developer Tools menus (Mac)

Once copied, you can paste the cURL command into the Trillworks site as in the below screenshot, and it will automatically convert the command into Python's request syntax.
When using Trillworks, make sure to use Readypipe's request and not the standard Python request library.
This can be particularly handy when debugging POST requests (especially the data parameter).
Most of the time you can safely delete the headers parameter of the request (Readypipe intelligently applies an up-to-date User-Agent and other headers automatically), though sometimes specific headers will help your requests succeed.
Screenshot of Trillworks curl conversion

Simply copy the Python request and paste it into Readypipe for testing.
I changed my code in a Python file but I still see the old definition being used in my notebook
As mentioned in the Getting Started section, if you change your code in a .py file you'll need to re-import it into your notebook to use the changed code.
Helper Tools
Along with core data collection functionality, Readypipe includes tools to help you monitor your projects and analyze the results.
Email alerting
from readypipe import starting_task, query, send_email

### PLAIN TEXT EXAMPLE ###
# To add an automated alert, add another @starting_task
# to a deployed project that's collecting data
@starting_task
def send_plaintext_alert():
    # Based on how many observations are typical
    # for this specific project
    EXPECTED_OBSERVATIONS = ...

    # Query database for number of observations
    # found per day
    data = query(
        """SELECT COUNT(id) FROM observed_data
        /* WHERE dependent on your project schedule */
        WHERE DATE(date_added) = DATE(NOW())
        """)
    todays_observations = data[0][0]
    if todays_observations < EXPECTED_OBSERVATIONS:
        send_email(
            to="you@your-domain.com",
            subject_line="ALERT: Abnormal observation count",
            body="Fewer observations found than expected"
            dataframe=data,
            compression='gzip',
        )

### HTML EXAMPLE ###
@starting_task
def send_html_alert():
    results = query('SELECT * FROM observed_data')
    results_html = results.to_html()
    send_email(
        to="you@your-domain.com",
        subject_line="Daily email report",
        body=results_html,
        email_subtype="html",
    )
Readypipe offers email alerting to help you monitor projects.
This can be useful in a number of scenarios:
- Alerting you when unexpected conditions arise in your data
- Emailing the results of a data collection run
- Reporting summary statistics for project data
- Etc.
Users can use the send_email function to send an email with a CSV attachment containing a Pandas dataframe.
By default, the attachment will be compressed in gzip format but you can also optionally attach the data in an uncompressed format - this can be useful for previewing the data directly in some email clients like Gmail.
send_email(to, subject_line, body, dataframe=None, email_subtype='plain', compression='gzip')
| Parameter | Type | Description |
|---|---|---|
| to | list/string | An email (or list of emails) to send the email to |
| subject_line | string | The subject line of the alert email |
| body | string | The plain-text or HTML message body of the alert |
| dataframe | DataFrame | A pandas DataFrame object. Defaults to None, but if passed automatically attaches a compressed CSV file containing the data to the message. CSV size must not exceed 100MB. |
| email_subtype | string | Options are 'plain' or 'html'. If plain, will display body as plain text. If html, will render the HTML in the body of the email. Defaults to plain |
| compression | string | Options are 'gzip' (the default) or None. Determines the compression algorithm to use when attaching a dataframe to the email. |
View installed packages
Readypipe includes a number of Python packages installed by default to make development easy.
You can follow the below steps to see what's currently installed in Readypipe in production at any time:
1) Open the launcher by clicking the plus button in the below screenshot
Click the plus button to open the launcher
2) Select the "Terminal" option from the launcher
Select "Terminal"

3) Run the command pip freeze in the terminal to see what packages are installed
Installing new packages
# install the library at the top of app.py:
from pip._internal import main as pipmain

# replace `pyplot` with your package name
pipmain(['install', 'pyplot'])

# once this cell has run once, you can
# remove the above install code and
# import the newly installed package
import pyplot

# then proceed with the rest of your code:
from readypipe import requests, starting_task, subtask
Making it easier for users to install third party packages in Production is on our product roadmap.
Until this feature is released, you can install Python packages by using a workaround in your app.py file.
Pip is a package management system used to install and manage software packages in Python. Including a command similar to the one on the right will install the library each time you deploy your code to Production.
When you have many packages you need to install, you can add them all to a requirements.txt file and run the following command:
pipmain(['install', '-r', 'requirements.txt'])
Importing code from other files
Jupyter Notebooks can import Python code from any .py files you add to the file explorer. Users may sometimes experience issues when they create the .py file after a Notebook kernel has already started.
The simplest solution to this problem is restarting the notebook kernel; because the kernel started before the .py file was created, it doesn't know about this new file while running.
To restart the kernel, simply use the Kernel dropdown menu and select the "Restart Kernel" option.
Screenshot of the Kernel menu
Release Notes
June 16, 2019
Run arbitary code after a run has completed and any saved data is available to query
Send email attachments containing data without compressing the attachment
May 3, 2019
- Run a task suite ("smoke test")
April 29, 2019
New API methods
Updates to existing APIs
- Add
statusfield toProjectandTaskresources - Add
currently_runningandnext_runfield to starting tasks - Expose
database_schemain project list endpoint
Open Browser enhancement
- Ability to wait for selector to load on page before proceeding
April 11, 2019
Additional task API methods
- Change a starting task frequency and subtask concurrency via API call
- Kick off a starting task with arguments
Documentation for interacting with a page using open_browser
- Clicking, typing into forms and selecting options
April 8, 2019
Ability to launch a starting task programmatically
- Kickoff a starting task with an API call
Version control API
- See and restore older versions of project files
Logging table updates
run_uuidnow present in all logging tablesheaderscolumn broken out explicitly inpipeapp_http_requests- Note: these fields will not be backfilled for historical records, but will be written on all new records after this release date
March 27, 2019
Adds various public API methods
- List all projects across your organization
- List all tasks per project
- Inspect, clear Primary queue
- Inspect, clear Failed Items queue; restore Failed Items to Primary queue
Failed Items queue and max attempts and drop_failed_items subtask arguments
- Pass max_attempts as an argument to a subtask decorator to implement a maximum number of attempts before the item is moved to the Failed Items queue
- Items are automatically added to this queue after the item's
attemptscounter exceeds the value passed tomax_attempts - Cannot interact with the Failed Items queue in the UI yet; coming in a future release
Project list page redesign
February 15, 2019
Stop retrying an item if it continues failing after [X] attempts
from readypipe import get_attempts- In tasks, test if get_attempts() >= MAX_ATTEMPTS (defined by you) and if it is, return and don't retry
- Attempts are maintained in task state (
bundled_data)
See what Puppeteer renders in the browser in a notebook (helpful for debugging)
- Pass
open_browser(visual_debug=True)when instantiating the context manager in a notebook (will not do anything in Production) - When the cell is executed, renders an image in the output displaying browser content
Various improvements to pipeapp_http_requests table
open_browserand Selenium now write to pipeapp_http_requests (deployed projects only, and only for the main request - will not record background requests)- Properly log headers on each request
- Log proxy provider, proxy region information (HTTP requests only today, to add Puppeteer support in future)
from readypipe import selenium- Automatically plugs into our proxy IP network when imported from
readypipe - Primarily supported to assist in migrating existing projects
- Active development work will continue to focus on
open_browser
Additional Resources
Readypipe specific support:
- The chat widget in the bottom right of the app can be used to contact the Readypipe team
- You can also email us at support@readypipe.io with questions
Debugging Requests:
- Paste a
curlcommand into Trillworks to get a generate the equivalent Python request
Website traffic estimation services
Helpful for understanding the typical volume of traffic a website receives:
Interacting with the Web:
XPath Help:
- XPath Helper Chrome Extension
- XPath "Cheat Sheet"
- XPath syntax technical reference
- Interactive XPath game
Querying data:
- Our
querymethod uses PrestoDB functions under the hood